-
[Ansible] 반복문과 조건문, Roles(스터디 2주차)Infra/Cloud 2024. 1. 19. 17:13
오늘은 스터디 2주차로 주제는 반복문과 조건문, Roles이다.
Ansible의 반복문과 조건문은 의미 그대로 반복이 필요할때 사용하거나 특정조건이 충족되었을 때 사용하도록 할 수 있다.
또한 Ansible Role의 경우 굉장히 유용하다는 생각이 들었다.
똑같다고 할 수는 없지만 디렉토리 구조로 진행되는 과정이 Terraform Module 사용과 비슷하다는 느낌을 받았다.
Ansible 반복문
Variables, Conditionals, Loops - Ansible Handbook
Just like any other Scripting or programming language we can use variable in ansible playbooks. Variables could store different values for different items. Variables help us to have shorter and more readable playbooks. Imagine we want to apply patches on h
borosan.gitbook.io
* 자주 활용하는 module:
- ansible.builtin.service
- ansible.builtin.shell
- ansible.builtin.file
- etc...
* 사용 키워드:
- loop( 반복해야하는 항목의 목록 값을 loop로 사용 )
- item( 해당하는 값 사용 시 item 변수 이용 )
[예제]
- 반복문을 이용해 모든 관리서버의 sshd, rsyslog, httpd의 service가 구동되고있는지 확인해보기로했다.
# 반복문 사용전
---
- hosts: all
  tasks:
    - name: Check sshd state
      ansible.builtin.service:
        name: sshd
        state: started

    - name: Check rsyslog state
      ansible.builtin.service:
        name: rsyslog
        state: started

    - name: Check httpd state
      ansible.builtin.service:
        name: httpd
        state: started
# 반복문 사용 --- - hosts: all tasks: - name: Check sshd state ansible.builtin.service: name: "{{ item }}" state: started loop: - sshd - rsyslog - httpd=> 단순 반복되는 작업을 해야하는 경우 loop를 이용하여 이와 같이 반복되는 작업을 줄일 수 있다.
- 결과
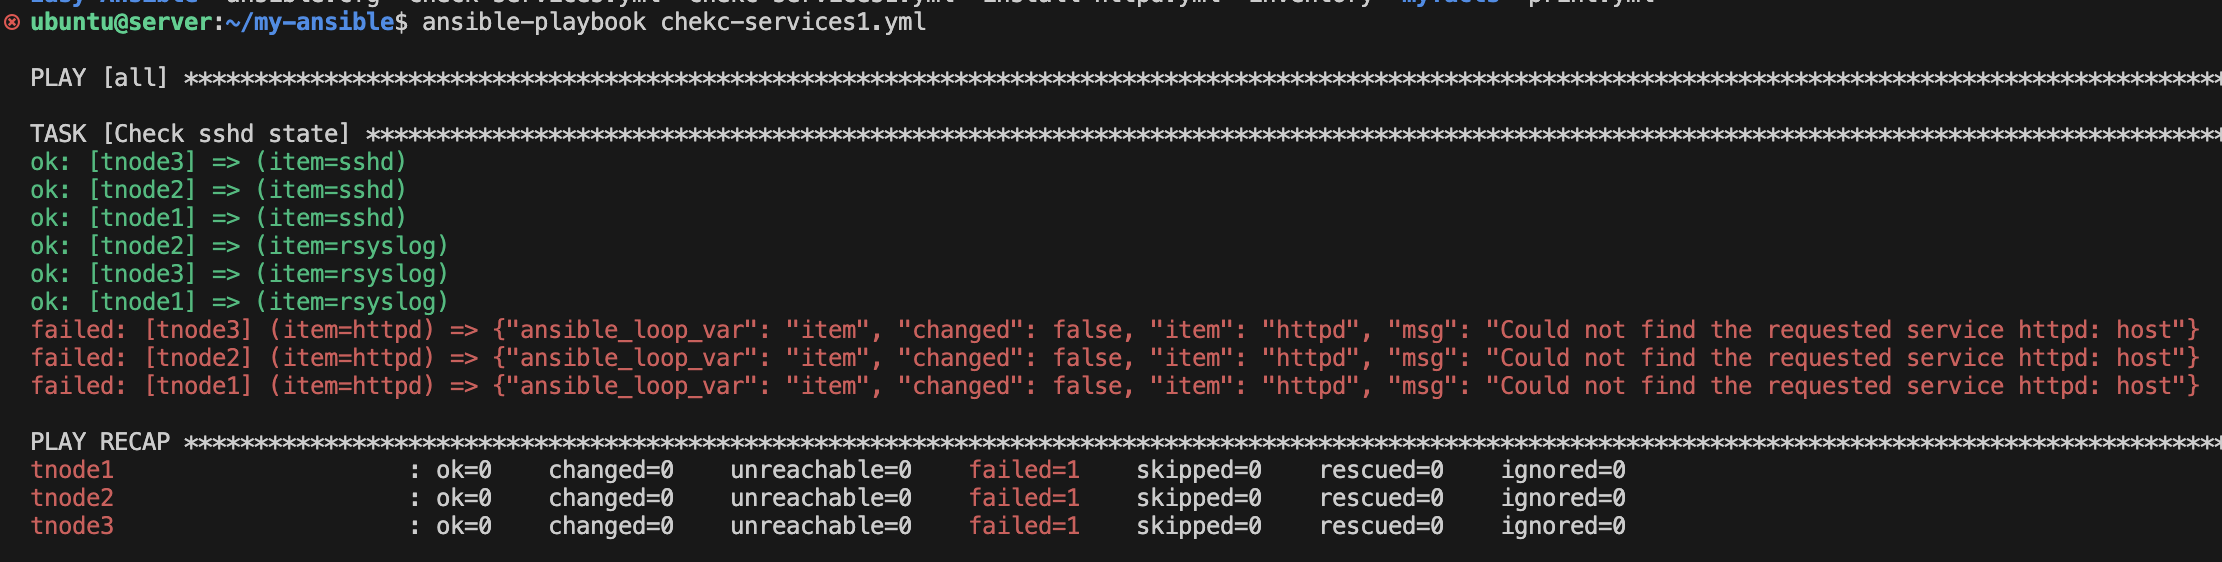
=> 현재 나의 관리서버 환경에는 http daemon이 구동되고 있지 않으므로 다음과 같은 결과를 볼 수 있었다.
[ 도전과제1 ]
- linux user1~10(10명) 를 반복문을 통해서 생성 후 확인 후 삭제를 해보자
---
- hosts: all
  tasks:
    # 생성 시, 사용
    - name: Add user
      ansible.builtin.user:
        name: "{{ 'test' + item | string }}"
      loop: "{{ range(1, 11) | list }}"

    # 삭제 시, 사용
    - name: Delete user
      ansible.builtin.user:
        name: "{{ 'test' + item | string }}"
        state: absent
      loop: "{{ range(1, 11) | list }}"
ansible -m shell -a "tail -n 10 /etc/passwd" all=> 해당 playbook 사용 시 test계정 10개가 생성 후 삭제된다(캡쳐화면은 삭제부분 주석처리 후 실행)
[도전과제 2]
- loop 반복문 중 sequence 를 이용하여 /var/log/test1 ~ /var/log/test100 100개 파일(file 모듈)을 생성 확인 후 삭제를 해보자
---
- hosts: all
  tasks:
   - name: show file(s) contents
     ansible.builtin.file:
      path: /var/log/test{{ item }}.log
      mode: '0600'
      state: touch
     with_sequence: start=1 end=100

   # 삭제 시, 사용
   - name: show file(s) contents
     ansible.builtin.file:
      path: /var/log/test{{ item }}.log
      state: absent
     with_sequence: start=1 end=100
=> 100개의 로그파일이 '600'권한으로 생성되었다(위의 playbook 진행 시, 생성 후 삭제됨)
Ansible 조건문
Conditionals — Ansible Documentation
In a playbook, you may want to execute different tasks or have different goals, depending on the value of a fact (data about the remote system), a variable, or the result of a previous task. You may want the value of some variables to depend on the value o
docs.ansible.com
* 사용 키워드:
- when
* 조건 연산자:
- != : 값이 같지 않을 때 참 true
- >, >=, <=, < : ‘초과, ‘ 이상’, ‘이하’, ‘미만’ 일 때에 참 true
- not : 조건의 부정
- and, or : ‘그리고’, ‘또는’의 의미로 여러 조건의 조합 가능
- in : 값이 포함된 경우에 참 true. 예를 들어 2 in “1, 2, 3” 은 참 true
- is defined : 변수가 정의된 경우 참 true
연산예시 설명 ansible_facts[’machine’] == “x86_64” ansible_facts[’machine’] 값이 x86_64와 같으면 true max_memory == 512 max_memory 값이 512와 같다면 true min_memory https://www.youtube.com/watch?v=u17SmSSQ9rE 128 min_memory 값이 128보다 작으면 true min_memory > 256 min_memory 값이 256보다 크면 true min_memory <= 256 min_memory 값이 256보다 작거나 같으면 true min_memory >= 512 min_memory 값이 512보다 크거나 같으면 true min_memory != 512 min_memory 값이 512와 같지 않으면 true min_memory is defined min_memory 라는 변수가 있으면 true min_memory is not defined min_memory 라는 변수가 없으면 true memory_available memory 값이 true이며 true, 이때 해당 값이 1이거나 True 또는 yes면 true not memory_available memory 값이 false이며 true, 이때 해당 값이 0이거나 False 또는 no면 true ansible_facts[’distribution’] in supported_distros ansible_facts[’distribution’]의 값이 supported_distros 라는 변수에 있으면 true [예제]
- run_my_task 변수의 값이 true일 때만 task가 실행되도록 확인해보았다.
---
- hosts: localhost
  vars:
    run_my_task: true

  tasks:
  - name: echo message
    ansible.builtin.shell: "echo test"
    when: run_my_task
    register: result

  - name: Show result
    ansible.builtin.debug:
      var: result
run_my_task 값이 true 인 경우 
run_my_task 값이 false 인 경우 [ 복수조건문 예시 ]
- and나 or을 사용할 수 있다.
---
- hosts: all

  tasks:
    - name: Print os type
      ansible.builtin.debug:
        msg: >-
             OS Type: {{ ansible_facts['distribution'] }}
             Bios_vendor: {{ ansible_facts['bios_vendor'] }}
      when:
        ( ansible_facts['distribution'] == "Ubuntu" and
          ansible_facts['bios_vendor'] == "Amazon EC2")
       or
        ( ansible_facts['distribution'] == "CentOS" and
          ansible_facts['distribution_version'] == "22.04")
[도전과제 3]
- Ubuntu OS이면서 fqdn으로 tnode1 인 경우, debug 모듈을 사용하여 OS 정보와 fqdn 정보를 출력해보자.
---
- hosts: all
  tasks:
    - name: Node info
      ansible.builtin.debug:
        msg: >-
             fqdn info: {{ ansible_facts['fqdn'] }}
             hostname: {{ ansible_facts['hostname'] }}
             OS Type: {{ ansible_facts['distribution'] }}
      when:
        - ansible_facts['fqdn'] == "ip-10-10-1-11.ap-northeast-2.compute.internal"
        - ansible_facts['distribution'] == "Ubuntu"
[도전과제 4]
- 반복문+조건문을 함께 사용해보자
Conditionals — Ansible Documentation
In a playbook, you may want to execute different tasks or have different goals, depending on the value of a fact (data about the remote system), a variable, or the result of a previous task. You may want the value of some variables to depend on the value o
docs.ansible.com
---
- hosts: all
  tasks:
    - name: Node info
      ansible.builtin.debug:
        msg: >-
             information: {{ ansible_facts[item] }}
      loop:
        - hostname
        - distribution
      when: ansible_facts['distribution'] == "Ubuntu"
핸들러 및 작업 실패 처리
- 일부 task시, 시스템 변경 후 추가작업이 필요한 상황이 존재(예를 들어, 서비스 구성 파일 변경 후 변경내용 저장을 위한 서비스 재기동)
- 이때 사용할 수 있는 것이 Handler이며 다른 작업에서 트리거한 알림에 응답하는 작업.
- 해당 host에서 작업이 변경될 때만 핸들러에 통지함
- notify문을 이용하여 사용
[예제]
- rsyslog 재시작 task 실행 시, notify 키워드를 통해 print msg라는 handler 호출
---
- hosts: tnode2
  tasks:
    - name: restart rsyslog
      ansible.builtin.service:
        name: "rsyslog"
        state: restarted
      notify:
        - print msg

  handlers:
    - name: print msg
      ansible.builtin.debug:
        msg: "rsyslog is restarted"
[도전과제 5]
- apache2 패키지를 apt 모듈을 통해서 설치 시, 핸들러를 호출하여 service 모듈로 apache2를 재시작 해보자
---
- hosts: tnode3
  tasks:
    - name: Install apache httpd  (state=present is optional)
      ansible.builtin.apt:
        name: apache2
        state: present
      notify:
      - restart apache

  handlers:
    - name: restart apache
      ansible.builtin.service:
        name: "apache2"
        state: restarted
ansible -m shell -a "systemctl status apache2" tnode3
작업 실패 무시
- 일반적으로 Ansible은 task가 실패하면 이후의 모든 task를 건너뛴다.
- 작업이 실패한경우에도 다음 task를 실행하기위해 사용하는 것이 바로 'ignore_errors' 키워드이다.
[예제]
---
- hosts : tnode1

  tasks:
    - name: Install apache3
      ansible.builtin.apt:
        name: apache3
        state: latest

    - name: Print msg
      ansible.builtin.debug:
        msg: "Before task is ignored"
=> 'Install apache3' task 실패로 다음의 'Print msg'가 실행되지 않은 것을 볼 수 있었다.
* Ignore_errors 키워드 사용
---
- hosts : tnode1

  tasks:
    - name: Install apache3
      ansible.builtin.apt:
        name: apache3
        state: latest
      ignore_errors: yes

    - name: Print msg
      ansible.builtin.debug:
        msg: "Before task is ignored"
=> 'Install apache3' task가 실패했지만 다음 task가 정상적으로 동작함을 알 수 있었다.
작업 실패 후 Handler 실행
- 일반적으로 작업이 실패하고 해당 호스트에서 Play가 중단되면 이전 작업에서 알림받은 모든 Handler 역시 실행되지 않는다.
- 작업이 실패하여 Play가 중단되더라도 알림받은 Handler를 호출하는 키워드가 바로 'forece_handlers: yes'이다.
[예제]
---
- hosts: tnode2

  tasks:
    - name: restart rsyslog
      ansible.builtin.service:
        name: "rsyslog"
        state: restarted
      notify:
        - print msg

    - name: install apache3
      ansible.builtin.apt:
        name: "apache3"
        state: latest

  handlers:
    - name: print msg
      ansible.builtin.debug:
        msg: "rsyslog is restarted"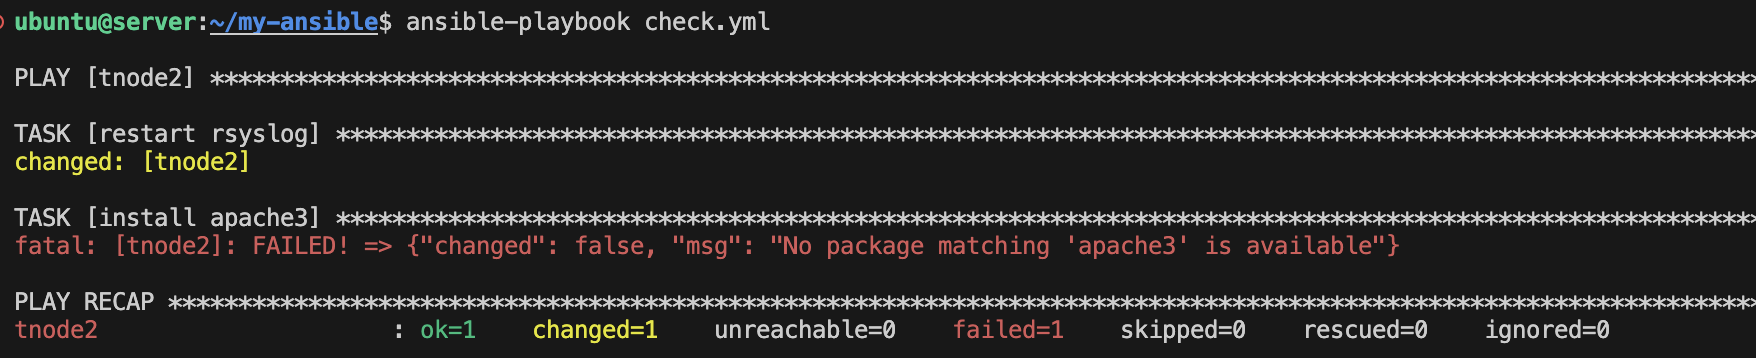
* 'forece_handlers: yes' 키워드 사용
---
- hosts: tnode2
  force_handlers: yes

  tasks:
    - name: restart rsyslog
      ansible.builtin.service:
        name: "rsyslog"
        state: restarted
      notify:
        - print msg

    - name: install apache3
      ansible.builtin.apt:
        name: "apache3"
        state: latest

  handlers:
    - name: print msg
      ansible.builtin.debug:
        msg: "rsyslog is restarted"
=> 실패하였음에도 알림(notify)을 받은 handler가 정상적으로 호출된 것을 볼 수 있었다.
Ansible 블록 및 오류처리
- block 문법을 통해 오류를 제어할 수 있음.
- block은 작업을 논리적으로 그룹화해주며 block을 통해 작업 실행방법을 제어할 수 있음
- block : 실행할 기본 작업을 정의함
- rescure : block 절에 정의된 작업이 실패할 경우 실행할 작업을 정의함
- always : block 및 rescue 절에 정의된 작업의 성공 또는 실패 여부와 관계 없이 항상 실행되는 작업을 정의함
[예제]
---
- hosts: tnode2
  vars:
    logdir: /var/log/daily_log
    logfile: todays.log

  tasks:
    - name: Configure Log Env
      block:
        - name: Find Directory
          ansible.builtin.find:
            paths: "{{ logdir }}"
          register: result
          failed_when: "'Not all paths' in result.msg"

      rescue:
        - name: Make Directory when Not found Directory
          ansible.builtin.file:
            path: "{{ logdir }}"
            state: directory
            mode: '0755'

      always:
        - name: Create File
          ansible.builtin.file:
            path: "{{ logdir }}/{{ logfile }}"
            state: touch
            mode: '0644'
=> block구문 내의 failed_when 구문을 통해 result.msg에서 "Not all paths"가 발견되면 실패로 처리하게되고 실패로 처리시, rescue 구문이 실행됨, 예제에서는 해당 디렉터리가 없는 경우 생성하게됨.
=> always구문의 경우 이름그대로 항상 실행되며 예제에서는 로그파일을 생헝함.
[도전과제 6]
- block rescure always 키워드를 사용한 플레이북을 작성하여 테스트 해보자
Blocks — Ansible Documentation
All tasks in a block inherit directives applied at the block level. Most of what you can apply to a single task (with the exception of loops) can be applied at the block level, so blocks make it much easier to set data or directives common to the tasks. Th
docs.ansible.com
---
- hosts: tnode2
  tasks:
    - name: Mangement user
      block:
        - name: Find user
          ansible.builtin.shell: "cat /etc/passwd | grep test1"
          register: result
          failed_when: '"" in result.msg'

      rescue:
        - name: Add user
          ansible.builtin.user:
            name: test1

      always:
        - name: Create manager user
          ansible.builtin.user:
            name: testuser-manager

        - name: Show result
          ansible.builtin.debug:
            var: result
=> 'test1' 계정이 존재하지않아 block 구문이 실패하였고 failed_when 설정을 통해 rescue 구문이 실행되었다. 따라서 'test1' 계정이 생성되었으며 항상 실행되는 always로 인해 testuser-manager 계정도 생성된 것을 볼 수 있었다(멱등성으로 기존상태 그대로 진행)
Ansible Roles
- Playbook 내용을 기능단위로 나누어 공통 부품으로 관리/재사용하기위한 구조를 의미한다.
- 대규모 프로젝트를 쉽게 관리할 수 있으며 다른 사용자와 동시 개발도 가능해서 굉장히 유용하다.
- 잘 만들어진 Role의 경우 엔서블 갤럭시를 통해 공유하여 다른 사람이 공유한 Role을 사용할 수 있다.
- Playbook에 전달된 변수를 사용할 수 있다(변수 미설정 시 기본값을 Role의 해당 변수에 설정하기도 한다)
Roles — Ansible Documentation
The classic (original) way to use roles is with the roles option for a given play: When you use the roles option at the play level, Ansible treats the roles as static imports and processes them during playbook parsing. Ansible executes each play in this or
docs.ansible.com
* Role의 구조는 다음과 같다.
하위 디렉터리 기능 defaults이 디렉터리의 main.yml 파일에는 롤이 사용될 때 덮어쓸 수 있는 롤 변수의 기본값이 포함되어 있습니다. 이러한 변수는 우선순위가 낮으며 플레이에서 변경할 수 있습니다.files이 디렉터리에는 롤 작업에서 참조한 정적 파일이 있습니다.handlers이 디렉터리의 main.yml 파일에는 롤의 핸들러 정의가 포함되어 있습니다.meta이 디렉터리의 main.yml 파일에는 작성자, 라이센스, 플랫폼 및 옵션, 롤 종속성을 포함한 롤에 대한 정보가 들어 있습니다.tasks이 디렉터리의 main.yml 파일에는 롤의 작업 정의가 포함되어 있습니다.templates이 디렉터리에는 롤 작업에서 참조할 Jinja2 템플릿이 있습니다.tests이 디렉터리에는 롤을 테스트하는 데 사용할 수 있는 인벤토리와 test.yml 플레이북이 포함될 수 있습니다.vars이 디렉터리의 main.yml 파일은 롤의 변수 값을 정의합니다. 종종 이러한 변수는 롤 내에서 내부 목적으로 사용됩니다. 또한 우선순위가 높으며, 플레이북에서 사용될 때 변경되지 않습니다.Ansible Role 생성하기
- ansible-galaxy를 통해 role을 생성할 수 있다.
ansible-galaxy role init my-role
=> role 생성 시, 위에서 설명한 role 구조대로 디렉터리와 main.yml 파일들이 생성된다.
* 다른사람이 만들어놓은 Role Search 및 상세보기
ansible-galaxy role search postgresql --platforms Ubuntu
ansible-galaxy role info geerlingguy.postgresql
* Role Install
ansible-galaxy role install -p roles geerlingguy.postgresql tree roles반응형'Infra > Cloud' 카테고리의 다른 글
[Ansible] 보안설정/모니터링 자동화, Semaphore (스터디 4주차) (0) 2024.02.13 [Ansible] 시스템 구축 및 환경 설정 자동화(스터디 3주차) (2) 2024.01.31 [Ansible] 환경구축 및 기본사용(스터디 1주차) (0) 2024.01.10 [AWS] LocalStack이란? (4) 2023.12.04 [AWS] Lambda와 Nodejs 이용한 영화 예매순위 알람 서비스 (0) 2023.12.04 댓글